Installation
Relevant parts for installation
Tools
- Use a Philips screwdriver to unscrew the screws to open the lid.
- Use a flathead screwdriver (2.5 mm) to connect the wiring and adjust the potentiometer.
Note:
Note:
Installation plan
Set up an installation plan before beginning. Based on the users' needs and with actual measurements of the wheelchair, this plan should specify where the unit will be placed, and how the cabling will be guided.
Connecting the input to the Adjustable fused Power Supply
CAUTION: Keep the supply (input) lead disconnected from any power source while wiring.
CAUTION: Use a proper flathead screwdriver to not damage the screw heads.
To connect the wiring in the Adjustable fused Power Supply unit, proceed as follows:
- Unscrew the 4 screws with a Philips screwdriver at the bottom of the box, and remove the lid.
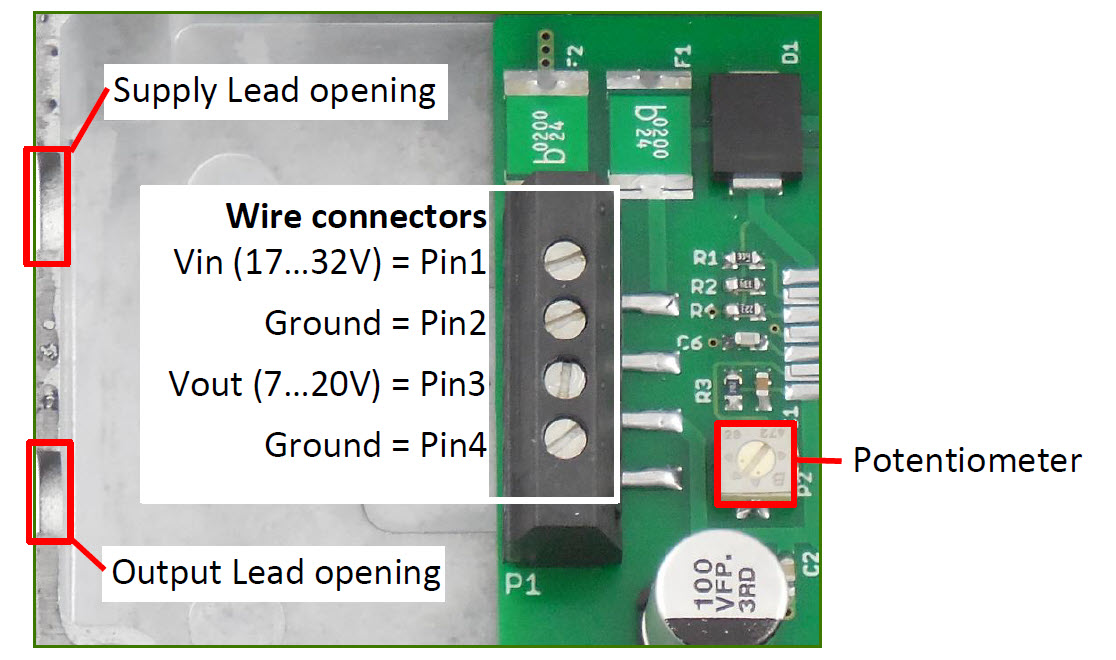
- Connect the supply (input) lead
- Connect the power to pin 1 = vin (17 … 32V)
- Connect the ground to pin 2 = ground
- Use a wire section of min. 1 mm2 (18 AWG)
Warning: If the supply lead is connected directly to the batteries, place a fuse of max. 10A between the unit and the battery connection, as close to the batteries as possible.An additional fuse is not needed in case the power is taken from the wheelchair electronics bus (R-net or DX) or the charger socket, as these have an integrated fuse.
- Connect the input to the wheelchair electronics.
Result: the green indicator LED on the unit turns on.
- Check the output voltage with a voltage meter.
- Adjust the output voltage using the potentiometer.
- Turn clockwise to increase the output voltage
- Turn counter clockwise to decrease the output voltage
- The output voltage is between 7 and 20V
CAUTION: Do not have any device connected to the output while adjusting the output voltage, as an excessive voltage may damage the device.
Connecting the output and installing the Adjustable fused Power Supply
- Connect the load (output) lead
- Connect the power to Pin 3 = vout (7 … 20 V)
- Connect the ground to Pin 4 = ground
- Use a wire section of min. 0.25 mm2 (30 AWG)
- Guide the supply and load leads through the respective openings
- Place the lid back on the boxCAUTION: Check that the supply and load leads remain properly in their respective openings to avoid damage to the warning.
- Fasten the lid back on the box with the 4 screws
- Place and secure the Adjustable fused Power Supply unit onto the wheelchair according to the installation plan. It is advised to install the unit with the indicator LED on top and the cable outputs at the bottom.
- Guide all cabling according to the installation plan
Note: